Angular ?
You must already have tasted to definitely love !
I guess it’s the same with React, View, etc. The choice of one or the other is personal, professional or contextual. For me it’s rather personal. After some research and reading, I had already used Angular for a private associative project. A modest project but which allowed me to understand the ins and outs of this framework.
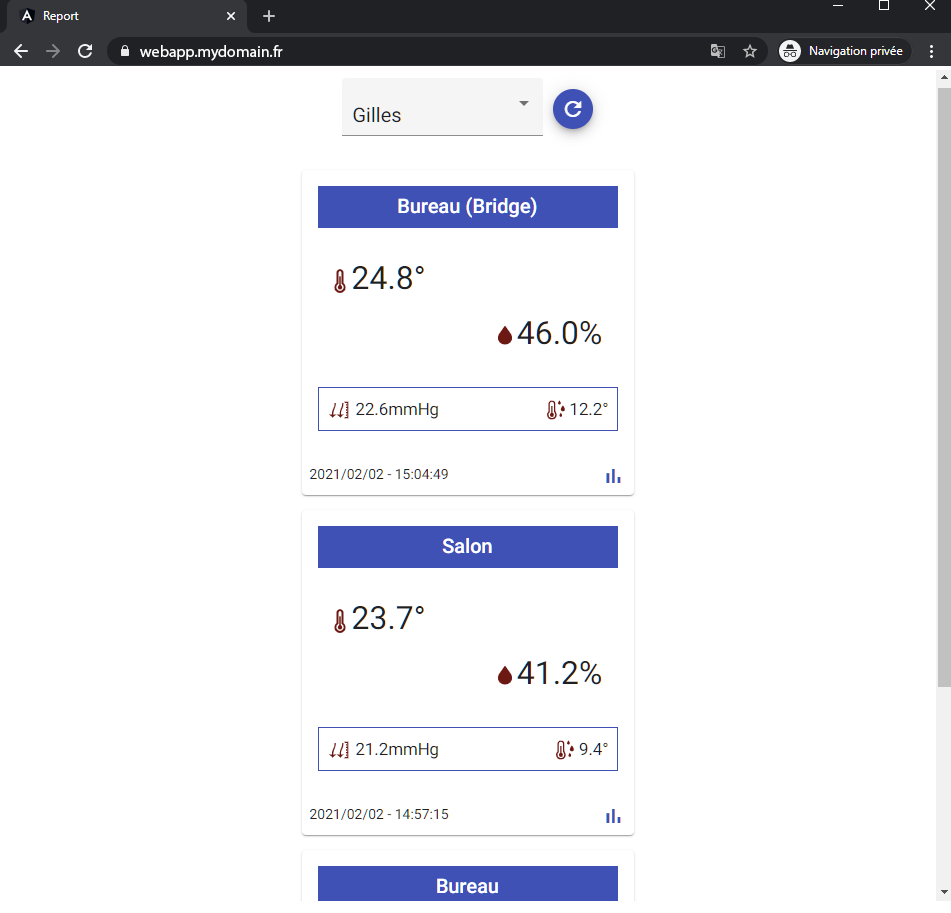
The Web-App is the intermediate step before the mobile-App.
I wanted to have a way to preview the devices’ measures without waiting for a mobile app. I still have in mind to use Flutter, but as this is a new framework (and language: DART), I already know that it will take me some time to get used.
I did not find useful to set up an authentication process. On one hand because the Web-App is a temporary way for data-visualization and on the other hand because the data are not confidential. If someone suceed to access the temperature and humidity measures from my brother-in-law’s wine cellar or my living room, great good !
Set environment
1) Create Virtual Host on Apache web server
Let’s refer to the previous chapter (API) in oder to install Apache, required modules and create SSL certificats.
In the same way, another Virtual Host is mandatory in order to serve the Web App URL.
Create Virtual Host folder (assuming Web App URL is webreport.mydomain.fr):
Create public_html folder in order to host the Web-App’s Angular files:
Create Virtual Host configuration file:
and copy following lines:
<VirtualHost *:80>
ServerName webreport.mydomain.fr
ServerAlias webreport.mydomain.fr
redirect permanent / https://webreport.mydomain.fr/
</VirtualHost>
<VirtualHost *:443>
ServerName webreport.mydomain.fr
ServerAlias webreport.mydomain.fr
DocumentRoot /var/www/webreport.mydomain.fr/public_html
ErrorLog /var/www/webreport.mydomain.fr/error.log
CustomLog /var/www/webreport.mydomain.fr/requests.log combined
SSLEngine on
SSLCertificateFile /<path-to-ssl-certificats>/mydomain.fr.cert.pem
SSLCertificateKeyFile /<path-to-ssl-certificats>/mydomain.fr.key.pem
SSLCertificateChainFile /<path-to-ssl-certificats>/mydomain.fr.fullchain.pem
</VirtualHost>
Enable site:
Restart Apache:
2) Install Web-App
and clone API App (cf GITHUB)
Move /dist folder’s content to Virtual Host folder:
Move to Virtual Host Assets’ folder:
Open settings.json file
and replace <API_URL> with the correct one, e.g. https://api.mydomain.fr:
{
}
Restart Apache:
Open web browser and enter the web-App URL to check display and API connection

3) OPTIONAL – Install development environment
Assuming that Web-App has already been cloned into PUB-DEVICE-SENSOR-WEBAPP cf above.
Move to sources folder:
Install libraries from package.json file (it will also install Angular CLI):
After modifications, build project:
Nice to know: Visual Studio Code + Remote-SSH pluging provides a tunnel from local to remote server. So, run ‘ng serve‘ open navigator to ‘localhost:422‘ for real-time testing
Inside the Web-App
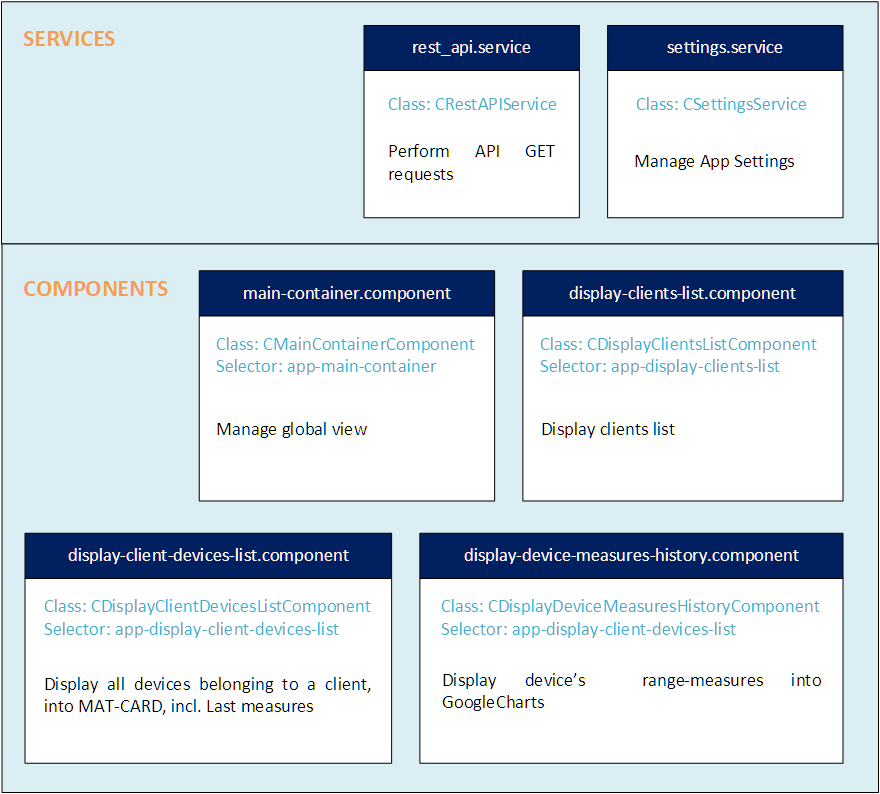
Web-App is also very simple: 2 services and 4 components. As mentionned above, there is no authentification step.
Schema below (+ comments into the source code) is cleared enough to understand the main structure:

To complete the loop, let’s take a look to the settings tools giving the ability to easily set-up the devices in one shot…


