Set environment
Few options are possible; noble’s ones (AWS, GCP, AZURE) and the others.
According to me, the first ones are definitly not appropriated for private development: too expensive ! So, I investigated a lot in order to look for a suitable hosting environment.
The cheapest one I found-out is FirstHeberg. A simple VPS GP1 (Virtual Private Server, 1VCore, 1GB RAM and 20GB SSD) is less than 3€/month incl. VAT, which is very convenient to run the project. I opted for a GP4 (2 vCores, 4GB RAM, 30 GB SSD – 7,2€/month incl. VAT) because of Angular development which requires more than 2GB RAM for serving (ng serve) and also because rather than having multiples VPS, I prefer to have only one for all my devs. But again, a GP1 is perfect for running this project (API + Angular Web-App + Angular Web-Settings-Tool-App).
As mentionned previoulsy, I’ve choosed a Debian OS just because MS Visual Studio Code nativly support remote connection to this one (maybe since I’ve wrote this lines, CentOS, Ubuntu and Co. are also well supported).
After ordering a VPS or any other hosting service, either you have been requested to create a key pair or you have received an email with a login/password, both to connect via SSH. Login password is not safe enough. So, let’s create an SSH key and disable login/password method.
1) Create SSK key pair file and remove login/password authentification
On your local computer (from WSL for Win10 users), create key pair files:
Press Enter key when prompt for saving the key into default id_rsa file. Eventualy enter a passphrase.
Move to ssh folder:
id_rsa contains the private key, and id_rsa.pub the public one. If you want to use the private key with an SSH tool like Putty, copy the content to a .ppk (or any other extension) on your local computer. Then, convert the private key with Putty Key Generator tool by loading the private key and saving to a Putty readable format.
Anyway, copy the public key to the remote-host-server.
Option #1: from local shell
Option #2: from ssh. Print-out the public key file content:
and copy the full string key starting by “ssh-rsa….”.
Connect to remote host server using a ssh tool and copy the public key to the authorized keys file:
Now, disable login/password authentification.
and uncomment the line PasswordAuthentication which should be set to no Finally, restart SSH server
2) Update Debian
followed by :
3) Install NodeJS and NPM
and verify installation by requesting the versions:
4) Install PostgreSQL
and verify installation by typing:
which should reply “…Accepting connections”
B) Permissions
Set Postgres system password:
Set postgres role password:
And set md5 authentication method to local:
Save file and restart PostgreSQL:
and type following command to enter shell:
Create Database (e.g. ‘cellar’) by entering following lines:
ALTER DATABASE cellar OWNER TO postgres;
Connect to the database:
Now, create the tables ans sequences:
CREATE TABLE public.tb_clients (
id SERIAL PRIMARY KEY,
api_client_id character varying(20) NOT NULL,
nickname character varying(20) NOT NULL,
device_token character varying(60),
app_token character varying(60)
);
ALTER TABLE public.tb_clients OWNER TO postgres;
CREATE TABLE public.tb_clients_keepalive (
id SERIAL PRIMARY KEY,
date_time timestamp without time zone NOT NULL,
client_id integer NOT NULL
);
ALTER TABLE public.tb_clients_keepalive OWNER TO postgres;
CREATE TABLE public.tb_devices (
id SERIAL PRIMARY KEY,
client_id integer NOT NULL,
device_addr smallint NOT NULL,
name character varying(30)NOT NULL
);
ALTER TABLE public.tb_devices OWNER TO postgres;
CREATE TABLE public.tb_devices_keepalive (
id SERIAL PRIMARY KEY,
date_time timestamp without time zone NOT NULL,
client_id integer NOT NULL,
device_id smallint NOT NULL
);
ALTER TABLE public.tb_devices_keepalive OWNER TO postgres;
CREATE TABLE public.tb_sensor_values (
id SERIAL PRIMARY KEY,
date_time timestamp without time zone NOT NULL,
client_id integer NOT NULL,
device_id integer NOT NULL,
temperature numeric,
humidity numeric,
partial_pressure numeric,
dew_point_temperature numeric
);
ALTER TABLE public.tb_sensor_values OWNER TO postgres;
ALTER TABLE public.tb_clients_keepalive ADD CONSTRAINT tb_clients_keepalive_client_id_fk FOREIGN KEY (client_id) REFERENCES public.tb_clients(id);
ALTER TABLE public.tb_devices_keepalive ADD CONSTRAINT tb_devices_keepalive_client_id_fk FOREIGN KEY (client_id) REFERENCES public.tb_clients(id);
ALTER TABLE public.tb_devices_keepalive ADD CONSTRAINT tb_devices_keepalive_device_id_fk FOREIGN KEY (device_id) REFERENCES public.tb_devices(id);
ALTER TABLE public.tb_sensor_values ADD CONSTRAINT tb_sensor_values_client_id_fk FOREIGN KEY (client_id) REFERENCES public.tb_clients(id);
ALTER TABLE public.tb_sensor_values ADD CONSTRAINT tb_sensor_values_device_id_fk FOREIGN KEY (device_id) REFERENCES public.tb_devices(id);
Finally, create the user, e.g. ‘api’ and set a user password:
GRANT ALL ON TABLE public.tb_clients TO api;
GRANT ALL ON TABLE public.tb_clients_keepalive TO api;
GRANT ALL ON TABLE public.tb_devices TO api;
GRANT ALL ON TABLE public.tb_devices_keepalive TO api;
GRANT ALL ON TABLE public.tb_sensor_values TO api;
GRANT USAGE ON SEQUENCE public.tb_clients_id_seq TO api;
GRANT USAGE ON SEQUENCE public.tb_clients_keepalive_id_seq TO api;
GRANT USAGE ON SEQUENCE public.tb_devices_id_seq TO api;
GRANT USAGE ON SEQUENCE public.tb_devices_keepalive_id_seq TO api;
GRANT USAGE ON SEQUENCE public.tb_sensor_values_id_seq TO api;
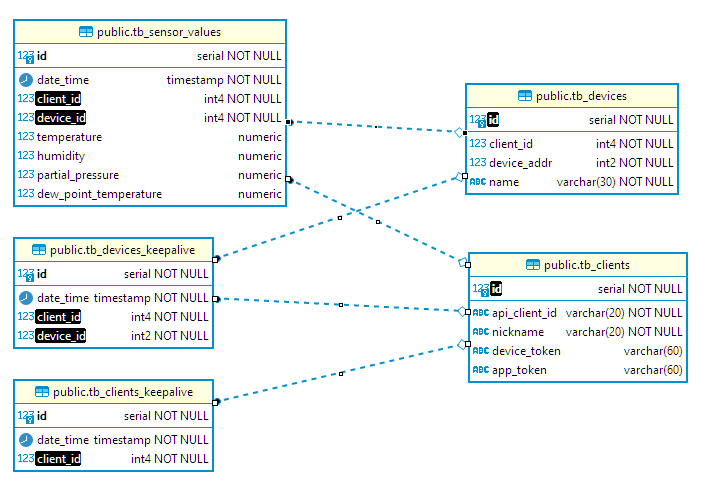
SQL code above will create tables, sequences and constrains and provide foolowing schema:

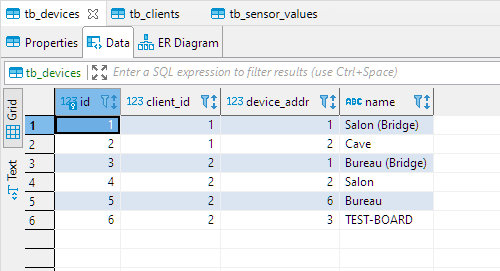
Right now, there is no GUI in order to update the database with new clients and devices. For this reason, I recommand to use a a tool, e.g. DBeaver Community, a multi-platform database administration tool, very powerfull and free.
a) set client: table ‘tb-clients‘
- api-client-id: corresponds to the APICLIENTID set into the bridge/server-sensor devices, in order to identify the devices-client relationship.
- nickname: the nickname of the client
- device_token: token used by bridge/server-sensor device in order to authentify the transaction.
- app_token: token used by Apps (Web or mobile) in order to authentify the transactions.

b) set devices: table ‘tb_devices’ contains the list of all bridge/server-sensor and multiple simple-sensor devices registered to clients:
- client_id: id into the ‘tb-clients‘ table corresponding to the client the device belongs to
- device_addr: the address device sensor.
- name: name of the device sensor.

5) Install Apache web server
A) Install server
and check status:
Add required modules:
and save IPTABLES modifications:
After rebooting, ensure that new rule has been recorded
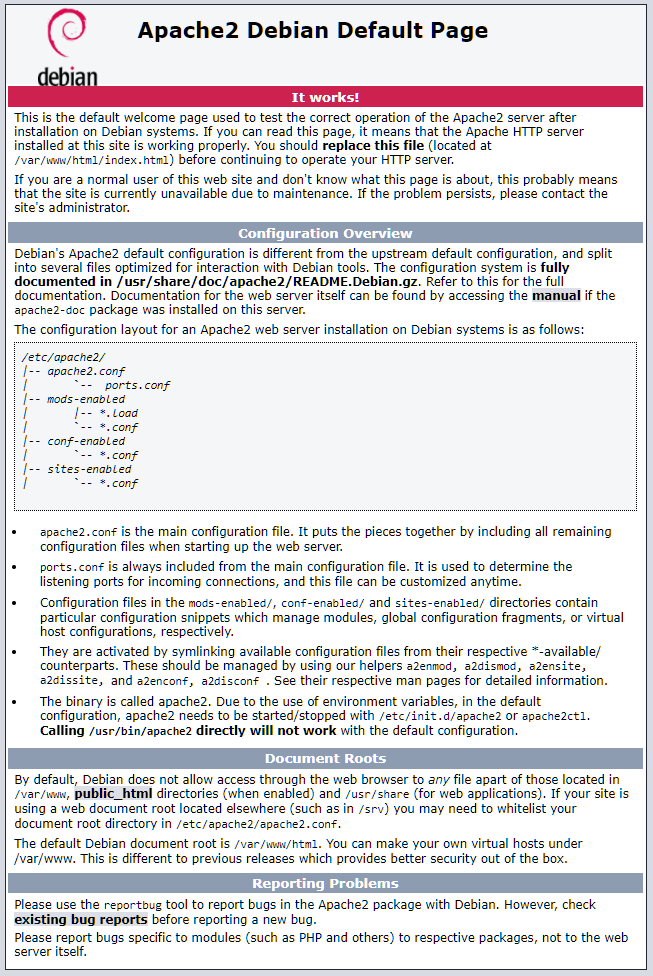
Open web browser and enter the server IP address to check that Apache is running

C) Create Virtual Host and set proxy a ProxyPass
Because VPS server only owns one IP address and we want multiple URL (at least 2: API and Web App) to be served, a virtual host is mandatory for each URL. Moreover, API is managed by a NodeJS App listening on a dedicated port, not the 443 one. For security reasons, it’s recommanded to not open multiple ports on a server. According to the URL, Apache will redirect the request on 443 to another internal port. Hence the need to set a ProxyPass. This is very simple.
If you do not have SSL certificats, jump to The Ultimate Raspi-Meeting-Room Project in order to follow-up free-wildcard SSL certificats creations.
b) Virtual host
Create Virtual Host folder (assuming API URL is api.mydomain.fr):
Create Virtual Host configuration file:
and copy following lines (port 443 is redirected to local port 8081 listened by the API App):
<VirtualHost *:443>
ServerName api.mydomain.fr
ServerAlias api.mydomain.fr
ProxyRequests Off
ProxyPreserveHost On
ProxyVia Full
<Proxy *>
Require all granted
</Proxy>
ProxyPass / http://127.0.0.1:8081/
ProxyPassReverse / http://127.0.0.1:8081/
<IfModule mod_headers.c>
<IfModule mod_rewrite.c>
SetEnvIf Origin “http(s)?://(.+\.)?(mydomain\.fr)(:\d{1,5})?$” CORS=$0
Header set Access-Control-Allow-Origin “%{CORS}e” env=CORS
Header merge Vary “Origin”
</IfModule>
</IfModule>
ErrorLog /var/www/api.mydomain.fr/error.log
CustomLog /var/www/api.mydomain.fr/requests.log combined
SSLEngine on
SSLCertificateFile /<path-to-ssl-certificats>/mydomain.fr.cert.pem
SSLCertificateKeyFile /<path-to-ssl-certificats>/mydomain.fr.key.pem
SSLCertificateChainFile /<path-to-ssl-certificats>/mydomain.fr.fullchain.pem
</VirtualHost>
Enable site:
Restart Apache:
6) Install API App
A) Install git
and clone API App (cf GITHUB)
Move /dist folder’s content to Virtual Host folder:
and copy settings.json and packages.json
Move to Virtual Host folder:
and install required libraries declared into package.json
Finally, open settings.json file
Open settings.json file and replace <POSTGRES_USER_NAME> and <POSTGRES_USER_PASSWORD>:
{
}
7) Install PM2
PM2 is a deamon process manager for Node.js runtime applications
Create and start a new process (from this point, API runs in background).
Save current PM2 process (required for auto-run at boot time)
Nice to know
List all running processes:
stop process:
restart process:
delete process:
8) OPTIONAL – Install development environment
Assuming that API App has already been cloned into PUB-DEVICE-SENSOR-API cf above
Move to sources folder:
Install libraries (from package.json file):
Install types/node library:
Install Typescript:
Compile .ts files – full.js compiled files are pushed into /dist folder:
Inside the API
API App is very simple. First of all, I must point out that I deliberately decided to code with typescrypt. According to me, NodeJS is not structured enough to play with classes, and this even if the object approach is a bit diverted because there is only one instantiation of each class. For my part, I thus find the code more readable and structured.
Schema below (+ comments into the source code) is cleared enough to understand:
- bridge/server-sensor devices POST data through a prefix URL, ‘/device‘, while App (Web and later, the mobile one) GET data from ‘/client‘ prefix
- Parameters from settings.json are passed at boot time by CMain(.js) to the instances.
- Logs are available according to the verbose level declared into settings.json
- All Postgres queries are performed by CPostgres.

Next, consume sensors measures with an App (starting with a Web App) …