Choosing the right Studio !
The question of the Development Studio is both contextual and personal.
For my part, I am a strong supporter of open-source tools as long as they fully meet the need.
In addition, the major technological domains have evolved; to Embedded, Desktop (and server) has been added the Cloud; the choice of a multi-domain tool makes sense, since we want to avoid multiple development environments.
The “rare pearl” presents a quest which very often comes up against difficulties. Eclipse, for example, is an interesting alternative, but the studio is so customizable that it becomes a gas factory.
 I’m not going to go through all of the tools I’ve reviewed, but rather focus on my last choice: VSC (Microsoft Visual Studio Code). It is certainly not the rare pearl, but it fulfills my main needs.
On one hand it is a free, open-source and multi-platform tool; on the other hand it is particularly well suited to “pure” code (without GUI design). The plug-in library is very rich and VSC provides very easy way to install. The “remote-ssh” plug-in for example allows to work remotely on a Cloud instance. The downside is that this only works with a Debian distribution. I tried with CentOS but gave up very quickly.
Unfortunatly, I did not find any plug-in for GUI design. Forms/windows design (C ++, C #, JAVA SWING, etc.) must be performed with another tool (Eclipse, Visual Studio), even if it means using VSC to code the backend.
What about Arduino IDE ?
To make a led bliking, that’s perfect !
In ancient times, setting up a development chain on an IDE was a hell. Things have changed a lot, and today everything is almost automatic and very suitable for newbies. So, let’s see setting-up VSC to create and compile Arduino projects…for free !
Setting-up VSC
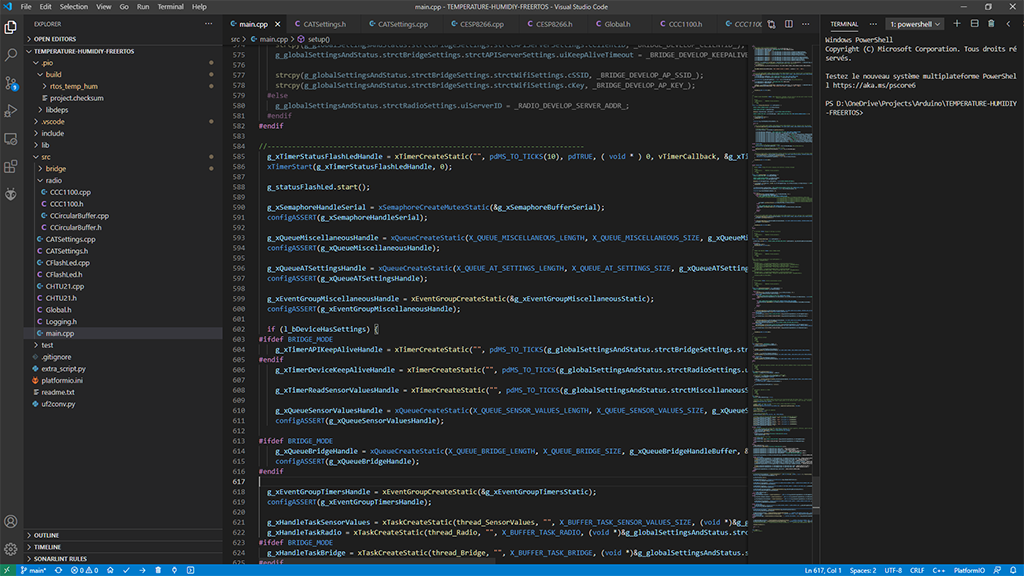
![]() 1) First, install PlatformIO plugin: Go to Extension Manager and search for PlatformIO IDE. After installing, a new icon is added into the left side bar. From the menu, any Arduino project can now be added by choosing the hardware, eventually the framework (meaning that some boards can also be set-up with e.g. ZEPHYR RTOS, FreeRTOS, etc. rather than Arduino framework and libraries). Menu gives also the ability to add libraries.
1) First, install PlatformIO plugin: Go to Extension Manager and search for PlatformIO IDE. After installing, a new icon is added into the left side bar. From the menu, any Arduino project can now be added by choosing the hardware, eventually the framework (meaning that some boards can also be set-up with e.g. ZEPHYR RTOS, FreeRTOS, etc. rather than Arduino framework and libraries). Menu gives also the ability to add libraries.
Important: files are only C, CPP and H. It’s over with INO extension !
2) Download source files from GitHub repository PUB_SENSOR_FIRMWARE and place content into a folder named “PUB_SENSOR_FIRMWARE” (another folder name implies to rename .pio/libdeps/<folder_name>). From VSC, click on File/Open Folder and select the new folder containing the downloaded files. Launch Build (dependencies and config files will be rebuilt).

OR

IMPORTANT: open the file platformio.ini and remove “debug_tool=jlink” and “upload_procol=jlink” if you don’t have a JLink debugging device and use Serial USB for uploading.
Libraries
Libraries are installed into to .pio/libdeps/PUB_SENSOR_FIRMWARE folder
1) FreeRTOS_SAMD21: this library from BriscoeTech is a subset of the main FreeRTOS operating system developed by Richard BARRY. Thanks to BriscoeTech, the library give the ability to implement real-time and multitasking on SAMD21.
Real-time is obviously not essential for this project (but remember that it is also good to have fun). On the other hand, multitasking allows the code to be structured much better and facilitates its implementation. The memory cost is not trivial. But for all that, the SAMD21 offers a large storage capacity as much FLASH as RAM. You might as well take advantage of the unused areas.
Because I don’t like dynamic memory allocation on embedded device and also in order to monitor the accurate RAM and FLASH usage, I’ve enabled STATIC ALLOCATION on FreeRTOS. So, I’ve performed the following settings:
- set #define configSUPPORT_STATIC_ALLOCATION to 1 into FreeRTOSConfig.h
- add #define INCLUDE_xTimerPendFunctionCall 1 into FreeRTOSConfig.h
- delete or comment file heap4_bis.c
2) FlashStorage: this library has been writtent by CMagalie in order to workaround the lack of EEPROM on SAMD devices. Such read-only memory is required in order to store the device settings and make them non-volatile.
This library does not seem to use the EEPROM emulation available on the SAMD21 which allows, thanks to a fuse, to reserve a dedicated space into the Flash. Indeed, when updating the firmware, all the Flash is erased, including the EEPROM emulation area which should normally be saved (I obviously did a test by activating the fuse).
3) Adafruit TinyUSB Library: this library implements the TinyUSB stack and has been suited by Adafruit in order to simply support Arduino board, e.g. SAMD. The real benefit is that in addition of CDC, WebUSB is also implemented, giving the ability for the device to be recognized by a web browser (the last versions of the main ones). In such conditions, a Web-App can access USB devices, opening the door to possibilities. cf Settings Tools
Firmware
All files are commented. The key points regards the flows between FreeRTOS Tasks. Image below provides the main approach :
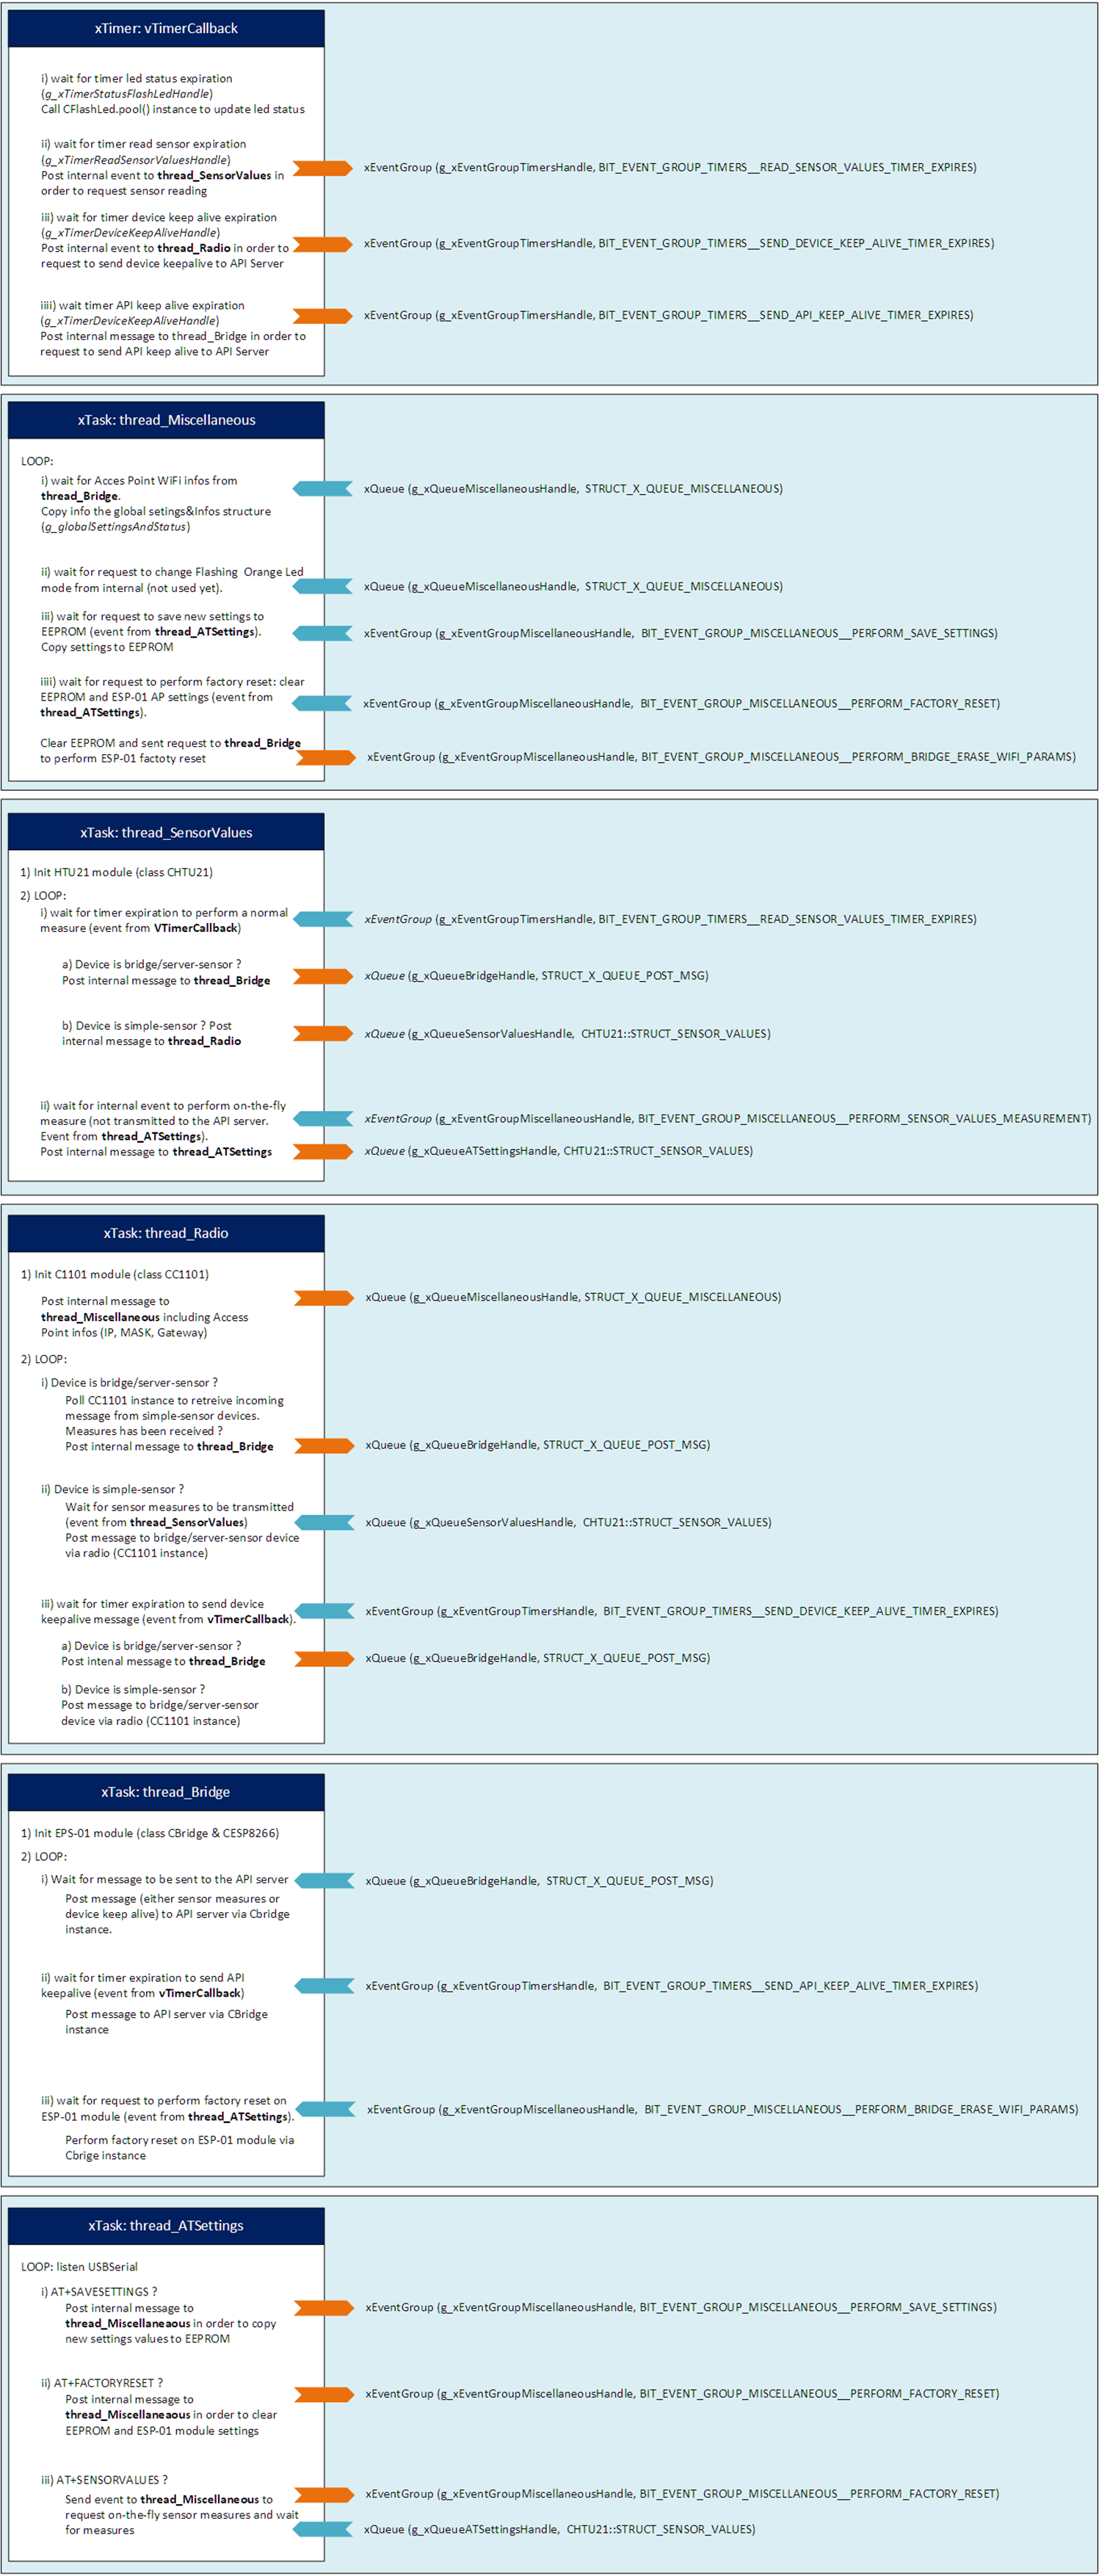
server/bridge sensor and simple-sensor devices share the same source code. Discrimination is performed thanks to a build directive:
into Global.h, set #define BRIDGE_MODE for server/bridge-sensor and #undef BRIDGE_MODE for simple-sensor.
Debugging: into Logging.h, set #define LOG_LEVEL to one of thes 5 values according to the expectation:
- LOG_LEVEL_SILENT
- LOG_LEVEL_ERROR
- LOG_LEVEL_WARN
- LOG_LEVEL_INFO
- LOG_LEVEL_DEBUG
By default, this directive is set to LOG_LEVEL_SILENT , otherwise, USBSerial will received real-time log messages.
Bootloader
Seeed Xiao module is provided with a bootloader derived from Atmel’s SAM-BA which, in addition to USB CDC (Serial) protocol, also support USB MSC (Mass Storage) and UF2 file format.
In other words, in order to upload a new firmware, just double-click on the reset button (assuming that the device is USB-connected to the computer). This operation causes the device to be recognized as a storage device (e.g.: USB sticker). So, just drag&drop the UF2 firmware file and wait for the device to automatically reset (this is very fast).
The platformio.ini file contains a dedicated line: extra_scripts = post:extra_script.py
by invoking BUILD process, the extra_script.py (Python file included into the project) is going to build a custom HEX file and invoking another Python file, uf2conv.py (also included into the project), exporting the uf2 firmware file, the one that can be draged&Dropped into the device as mentionned above.
The real benefit is that it is not necessary to install a dedicated firmware update tool. So it can be performed by an end user.
Basic settings
By default, devices are not configured. This can be identified thanks to the orange led, flashing very quickly 3-times, every seconds. Otherwise, led only flash once every 5 seconds.
Basic setting are perfomed thanks to the USBSerial and a serial monitor tool, e.g. Arduino Serial Monitor, Putty, shell (115200 bauds, 8 bits, no parity, 1 stop bit), or through the Web-USB behaving like the USBSerial for this project.
Rather than updating the parameters one by one, the AT+JSONSTATUS and AT+JSONSETTINGS commands respectively allow to retrieve and update the entire configuration at once. Two different approaches make it possible to take advantage of this. cf Settings tools.
Settings commands are AT ones, performing GET (AT+<COMMAND>?), SET (AT+<COMMAND>=<VALUE>) and DO (AT+<COMMAND>) actions:
- GET&SET
- AT+APIHOSTNAME(?/=): API host name without https://, e.g.:api.gepeo.fr
- AT+APIAUTHORIZATION(?/=): API token. can be empty
- AT+APIURI(?/=): URI of the API, e.g.: /devices
- AT+APIPORT(?/=): port number of the API, e.g.: 443
- AT+APICLIENTID(?/=): String-ID of the client. Can’t be null
- AT+APIKEEPALIVETIMEOUT(?/=): value in minutes of the keep-alive timeout for the bridge/server-sensor
- AT+APSSID(?/=): SSID of the WiFi Access Point
- SET
- AT+APKEY:<key-password of the WiFi Access Point >
- GET&SET
- AT+RADIOSERVERID(?/=): address of the local bridge/server-sensor
- AT+RADIOMAXRETRIES(?/=): maximum sending retries if bridge/server-sensor acknowledge failed
- GET&SET
- AT+RADIODEVICEID(?/=): address of the device from 1 to 127
- AT+RADIOOUTPWR(?/=): power of the radio output, 1:-30dbm, 2:-20dbm, 3:-15dbm, 4:-10dbm, 5: 0dbm, 6:5dbm, 7: 7dbm, 8:10dbm
- AT+RADIOMSGSIGNATURE(?/=): 2-bytes-ID passed into the radio payload in order to identify a devices family, e.g.: 48554 (from 1 to 65535)
- AT+RADIOKEEPALIVETIMEOUT(?/=): value in minutes of the keep-alive timeout for both devices bridge/server-sensor and simple-sensor
- AT+SENSORMEASUREMENTTIMEOUT(?/=): value (frequency) in minutes to perform a Temperature&Humidy measure
- AT+ECHO: 1 to enable echo mode, 0 to disable. By default, echo is disabled.
- SET
- AT+JSONSETTINGS: SET a one-shot settings values from a JSON-FOMAT
- DO
- AT+VERSION: return Firmware version
- AT+UID: return SAMD21 unique device ID
- AT+DEVICETYPE: return device type, BRIDGE-SERVER-SENSOR or SIMPLE-SERVER
- AT+SAVESETTINGS: save settings. This command is mandatory in order to save the settings into the EEPROM. Otherwise, all new settings will be lost.
- AT+FACTORYRESET: clear EEPROM and Access Point (bridge/server-sensor only) parameters.
- AT+USAGE: return usage of all AT commands
- AT+SENSORVALUES: return the current Temperature&Humidity values without sending to the API
- AT+STATUS: return the status of the device, including all the values above
- AT+JSONSTATUS: return a JSON-FORMAT of the AT+STATUS result
All AT commands are acknowledged by an OK response or a error message. After having send AT+SAVESETTINGS, device must be reset in order to use the new settings values.
Examples#1:
>OK
>AT+APKEY=mQY’U\\G!’Q\\~mL7c
>OK
>AT+APIHOSTNAME=api.gepeo.fr
>OK
> AT+APIPORT=443
>OK
>AT+APIURI=/device
>OK
>AT+APICLIENTID=ku458lPm
>OK
>AT+APIAUTHORIZATION=w{%}&}4v]>8TP\\Swveb
>OK
>AT+APIKEEPALIVETIMEOUT=60
>OK
>AT+RADIODEVICEID=1
>OK
>AT+RADIOMEGSIGNATURE=27856
>OK
>AT+RADIOOUTPWR=8
>OK
>AT+SENSORMEASUREMENTTIMEOUT=20
>OK
>AT+SAVESETTINGS
>OK
Examples#2:
AT+JSONSETTINGS={
“ap_ssid”:“MY_HOME”,
“ap_key”:“mQY’U\\G!’Q\\~mL7c”, “api_hostname”:”api.gepeo.fr”,
“api_port”:“443”,
“api_uri”:“/device”,
“api_client_id”:“ku458lPm”,
“api_authorization_token”:“w{%}&}4v]>8TP\\Swveb”,
“api_keepalive_timeout”:“60”,
“radio_device_id”:“1”,
“radio_message_signature”:“27856”,
“radio_output_power”:“8”,
“sensor_values_measurement_timeout”:“20”
}
>OK
>AT+SAVESETTINGS
>OK
Examples#3:
AT+JSONSETTINGS={
“radio_server_id”:“1”,
“radio_device_id”:“6”,
“radio_message_signature”:“27856”,
“radio_output_power”:“8”,
“radio_max_retries”:“3”,
“radio_keepalive_timeout”:“30”,
“sensor_values_measurement_timeout”:“20”
}
>OK
>AT+SAVESETTINGS
>OK
Next, populate measures’ database via an API server…